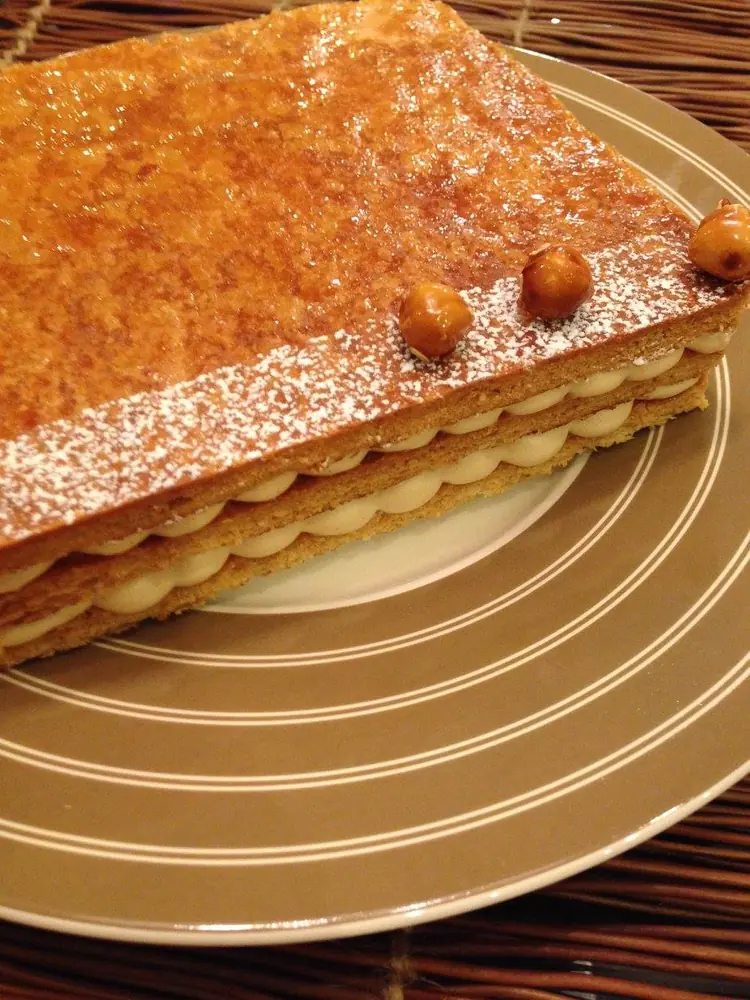
Mille-feuille is a pastry I judge first by texture. I want the puff pastry thin, dry and sharply layered, the surface lightly caramelized, and the vanilla cream smooth enough to eat beautifully but firm enough to stay controlled when the pastry is cut.
For this version I use my inverse puff pastry method. It is not the only correct way to make mille-feuille, but it gives me the crisp, fragile layering I want for this dessert.
My mille-feuille formula
This is the full laminated-dough batch I use. For one assembled mille-feuille, bake enough pastry to cut three equal rectangles and keep or freeze any remaining laminated dough. The pastry-cream quantity below is a practical half batch of my standard crème pâtissière.
- Inverse puff pastry détrempe: 355 g flour
- 50 g granulated sugar
- 10 g fine salt
- 110 g unsalted butter, softened
- 5 g lemon juice
- 160 g cold water
- Outer butter-flour layer: 380 g unsalted butter
- 155 g flour
- Vanilla pastry cream: 500 g whole milk
- 90 g egg yolks
- 75 g granulated sugar
- 45 g cornstarch
- Vanilla, to taste
- Icing sugar, as needed for caramelizing the pastry
1. Make the détrempe
Put the 355 g flour, sugar, salt, softened butter, lemon juice and cold water into the mixer bowl. Mix with the dough hook until the dough is smooth and firm. In my production formula this usually takes about 10–15 minutes, but I still judge the dough by texture rather than the clock alone.
Shape it into a neat rectangle, wrap it well and refrigerate overnight. A long cold rest makes the dough easier to laminate without fighting accumulated gluten tension.
2. Make the outer butter layer
Mix the 380 g butter with the 155 g flour using the paddle until homogeneous. Shape this butter-flour mixture into a rectangle about 18 × 45 cm and refrigerate it until cold but still plastic enough to roll without cracking.
Roll the chilled détrempe to about 18 × 22 cm. Place it inside the butter-flour layer and enclose it with a small overlap so there are no exposed seams. In inverse puff pastry, the butter-rich layer is on the outside, so temperature and plasticity matter immediately.
3. Give the turns and rests
Roll the packet in the closing direction to about 6–8 mm thick and give one simple turn. Refrigerate for at least 30 minutes.
Roll in the opposite direction to 6–8 mm and give one double turn. Rest at least 30 minutes. Repeat one simple turn, then one final double turn, chilling whenever the butter becomes too soft or the dough resists. Refrigerate the finished laminated dough overnight before final sheeting.
4. Make the vanilla pastry cream
Bring the 500 g milk and vanilla to the boil. Whisk the yolks, sugar and cornstarch until completely smooth, then temper with part of the hot milk and return everything to the saucepan.
Cook while whisking continuously. Once the whole cream reaches a genuine boil, continue cooking for about 2 minutes so the starch is properly cooked. Spread the cream into a shallow clean container, protect the surface and cool promptly. Refrigerate at 2–4°C / 36–39°F until completely cold, then whisk briefly before piping to restore a smooth texture.
5. Sheet and bake the puff pastry
Roll the chilled laminated dough to 3–4 mm. Place it between sheets of baking paper and bake it with a second tray above it so the pastry expands in a controlled, even way instead of forming very tall irregular pockets.
Bake at 180°C / 356°F for about 20 minutes as a starting point. The pastry must be cooked through and dry, not simply brown on the surface. Oven performance and the exact size of the sheet can change the final drying time.
6. Caramelize the surface
Remove the upper tray and paper, dust the baked pastry evenly with icing sugar and return it to the oven at 200°C / 392°F for about 2–4 minutes, watching closely until the sugar melts and caramelizes.
This final step adds flavour, gives the pastry a fine glossy crispness and helps it resist moisture a little better after filling. Cool the pastry completely before trimming or assembling.
7. Cut three equal pastry layers
Trim the completely cooled sheet with a sharp serrated knife and cut three equal rectangles. I use a gentle sawing movement instead of pressing straight down, because pressure crushes the lamination and can splinter the caramelized surface.
Choose the flattest, most even rectangle for the top. The layers do not need to look mechanically perfect, but they should have similar thickness so the finished mille-feuille sits level.
8. Fill and assemble
Pipe an even layer of cold vanilla pastry cream over the first pastry rectangle. Add the second rectangle, pipe the second layer of cream, then finish with the third caramelized pastry sheet.
Do not press hard to level the dessert. Good mille-feuille should keep air between the baked leaves. If I need the finished pastry slightly firmer for cutting, I chill it briefly, but I do not leave it assembled for an unnecessarily long time because the cream gradually transfers moisture into the pastry.
Why I use inverse puff pastry for mille-feuille
In classic puff pastry, a butter block is enclosed inside the détrempe. In inverse puff pastry the butter-flour layer is outside. Both systems can make excellent mille-feuille, and I do not consider inverse pastry universally superior.
For this dessert I like the particularly fine, friable layering that inverse puff pastry gives when the turns, rests and baking are controlled correctly. It also suits the restrained, flat baking style I use for clean pastry layers.
Mille-feuille vs Napoleon: are they the same?
The names overlap in everyday use, but they are not perfectly interchangeable in every country or pastry tradition. A classical French mille-feuille is built around crisp laminated pastry and cream in distinct layers. Cakes called Napoleon can be made with different numbers of pastry layers, different creams and a softer final texture.
When I say mille-feuille here, I mean three crisp caramelized puff-pastry layers separated by vanilla pastry cream.
Why bake the pastry under a tray?
Unrestrained puff pastry can rise dramatically, which is beautiful for many products but inconvenient for mille-feuille. The filling needs broad, reasonably flat sheets that still show clear internal lamination.
The upper tray controls height without eliminating the layers. The objective is not to compress the pastry into a cracker; it is to guide the expansion so the sheet bakes evenly and can be assembled cleanly.
Why is my mille-feuille pastry soggy?
The first thing I check is whether the pastry was fully dried before filling. A sheet can be golden and still contain too much internal moisture. Underbaked pastry softens very quickly once pastry cream is added.
The second issue is timing. Assemble with completely cold pastry and cold cream, and serve reasonably close to assembly. Caramelization helps, but it cannot make puff pastry permanently waterproof.
Why did my puff pastry shrink or distort?
Shrinkage usually tells me the dough carried too much tension into the oven. Rushing the rests, stretching the dough during final sheeting or forcing cold resistant dough can all contribute.
Uneven butter plasticity can also distort the sheet. If the outer butter layer is brittle it fractures; if it is too soft it smears. I want dough and butter to extend together rather than one sliding or breaking against the other.
How do I cut mille-feuille cleanly?
Use a long sharp serrated knife and a light sawing motion. Do not try to force the blade through all the layers in one downward movement.
A short chill after assembly can make the cream easier to control, but very long refrigeration sacrifices crispness. For service, I choose the compromise that keeps the cream stable while preserving the pastry texture.
Can I make mille-feuille ahead?
Yes, but I prepare the components separately. The laminated dough can be made ahead and kept chilled or frozen. The baked caramelized pastry can be kept dry and airtight once completely cool. The pastry cream can be made ahead, rapidly chilled and kept at 2–4°C / 36–39°F for up to 2 days.
I assemble closer to serving rather than storing the finished dessert for a long period. The moment cream touches puff pastry, the texture begins to change.
Can I freeze mille-feuille?
I prefer freezing the laminated dough or the baked unfilled pastry rather than a finished mille-feuille. Pastry cream and crisp pastry do not improve through a freeze-thaw cycle in this formula.
If I freeze baked pastry, I refresh it briefly in the oven until crisp and dry again, then cool it completely before filling.
My rule for mille-feuille
I do not judge mille-feuille by how tall it is. I judge it by the contrast between crisp pastry and smooth cream, and by whether each forkful breaks cleanly without the filling escaping everywhere.
The pastry should taste of butter and caramelized wheat, the vanilla cream should stay clean and restrained, and the layers should remain recognizable. When those things are right, the dessert does not need much decoration.