Pain au chocolat is one of the clearest tests of laminated yeast dough because there is nowhere for weak structure to hide. The pastry should expand around the chocolate without becoming bready, greasy or compressed. For this recipe, I use the same laminated yeast dough as in my croissant article and change the geometry, chocolate and shaping rather than introducing a second competing dough without reason.
My pain au chocolat formula
This batch makes about 12–14 medium pains au chocolat, depending on trimming and final piece size:
- Strong white or baker's flour — 500 g
- Whole milk — 250 g
- Cold water — 40 g
- Granulated sugar — 55 g
- Fine salt — 10 g
- Fresh yeast — 15 g
- Unsalted butter in the dough — 25 g
- Unsalted cultured or high-fat butter for lamination — 225 g
- Dark chocolate batons — 2 per pastry
- Egg wash — as needed
Method
- Mix the flour, milk, water, sugar, salt, fresh yeast and 25 g dough butter until smooth and moderately developed. Do not overheat the dough.
- Flatten into a rectangle, cover and chill thoroughly. An overnight cold rest works well.
- Shape the 225 g lamination butter into an even, plastic rectangle and lock it neatly inside the cold dough.
- Roll progressively and complete three simple turns in total, resting in the refrigerator whenever the dough resists or the butter softens.
- After the final rest, sheet the dough to about 3–3.5 mm. Cut clean rectangles approximately 16 × 8 cm without crushing the cut edges.
- Place one chocolate baton near a short edge. Roll the dough once to enclose it, place the second baton against the first fold, then finish rolling so the seam sits underneath.
- Arrange on trays with enough space for expansion. Proof until visibly larger, aerated and delicate. A practical environment is about 26–28°C / 79–82°F; keep it cooler if the butter begins to soften.
- Brush gently with egg wash, avoiding heavy glaze on the exposed cut layers.
- Bake at about 190–200°C / 374–392°F fan or 200–210°C / 392–410°F conventional for roughly 16–20 minutes, depending on piece size and oven. Bake until deeply golden and fully set through the laminated centre.
- Cool briefly before eating. The chocolate will be very hot straight from the oven, and the pastry structure continues to set during the first minutes of cooling.
Why I use the same dough as my croissants
Croissant and pain au chocolat belong to the same family of pâte levée feuilletée. Professional formulas vary, but the essential mechanism is the same: fermented dough carries repeated butter layers, and steam from the dough and butter separates those layers during baking.
The product changes through shaping. A croissant is cut into triangles and rolled under tension; pain au chocolat is cut into rectangles and wrapped around chocolate. Keeping one well-controlled dough base makes it easier to diagnose the real variable: lamination, proofing, shaping or baking.
Why I use two chocolate batons
Two batons give a more even line of chocolate from one side of the pastry to the other, which is why this is the classical arrangement I use as my starting point. One baton can work for a smaller piece, but it leaves more of the crumb without chocolate.
I prefer purpose-made bakery batons when available because they are easy to position and remain controlled during baking. If you use a chocolate bar instead, cut narrow even sticks and avoid very soft fillings that can leak before the pastry sets.
Why the final thickness matters
At about 3–3.5 mm, the dough is thin enough to create a refined laminated structure but still strong enough to wrap the chocolate without tearing. If it is too thick, the pastry becomes heavy and bready. If it is too thin, the layers can compress or rupture during rolling.
I roll progressively and let the dough rest whenever it starts shrinking back. Forcing resistant dough is one of the easiest ways to squeeze butter out of position.
How I place the chocolate
The first baton goes near the short edge, not in the centre. I roll the dough once around it, add the second baton beside that first fold, then continue rolling. This creates two distinct chocolate lines and keeps the final seam underneath.
Do not stretch the rectangle aggressively around the chocolate. The dough should wrap the batons, not be pulled tight enough to compress the lamination.
How I judge final proof
I do not proof pain au chocolat until it simply doubles by volume. I look for a pastry that is visibly expanded, lighter, slightly trembling when the tray is moved and clearly aerated between the laminated layers.
Under-proofed pieces often leak butter and split because the dough is still too tight when oven spring begins. Over-proofed pieces feel fragile and can collapse or bake flatter because the gluten network has already lost too much strength.
Why proofing temperature must stay controlled
Some professional production systems use proofing temperatures around 30–31°C / 86–88°F, but they also control humidity, dough temperature and lamination butter very precisely. At home or in a small bakery, I prefer about 26–28°C / 79–82°F because it gives the yeast enough warmth without pushing the butter toward melting.
If butter becomes visibly soft or begins to seep before baking, lower the proofing temperature. More heat is not a shortcut to better proofing.
Why butter can leak in the oven
- The butter layers were broken during lamination.
- The butter smeared because the dough became too warm.
- The pastry was under-proofed and the layers could not expand cleanly.
- The dough and butter had incompatible firmness during rolling.
- The oven was not properly preheated and the pastry spent too long warming before the structure set.
Why pain au chocolat can turn out dense
- The dough was insufficiently developed before lamination.
- The layers were compressed by excessive rolling pressure.
- The final sheet was left too thick.
- The pastry was under-proofed.
- The yeast was weak or fermentation was too cold.
- The bake finished before the centre was fully set.
Why the layers can look compressed
Compressed layers usually begin before baking. The most common causes are forcing cold brittle butter, working with butter that is too soft, rolling too aggressively or pressing the finished pieces while shaping.
When I roll the rectangle around the chocolate, I keep the movement firm enough to hold the shape but gentle enough that the laminated cross-section remains visible at the ends.
Why the chocolate can leak
A little melted chocolate at the ends is not automatically a defect, but heavy leakage usually means the filling was too soft, the baton sat too close to an open edge or the pastry was rolled too loosely.
Purpose-made batons reduce this problem because their shape and cocoa-butter structure are designed for viennoiserie baking. If using ordinary chocolate, choose a firm bar rather than ganache or spread.
Can I freeze pain au chocolat?
Yes. For the best make-ahead workflow, freeze shaped unproofed pieces on a tray, then store them well wrapped once firm. Thaw under refrigeration, then proof normally until fully aerated before baking.
Baked pain au chocolat also freezes well. Reheat after thawing at about 170–180°C / 338–356°F until the crust becomes crisp again and the chocolate is warm.
Storage
Pain au chocolat is best on the day it is baked. Once cool, keep it well wrapped at room temperature for short storage. Refrigeration tends to stale laminated pastry quickly, so I prefer freezing for longer storage.
What I look for in the finished pastry
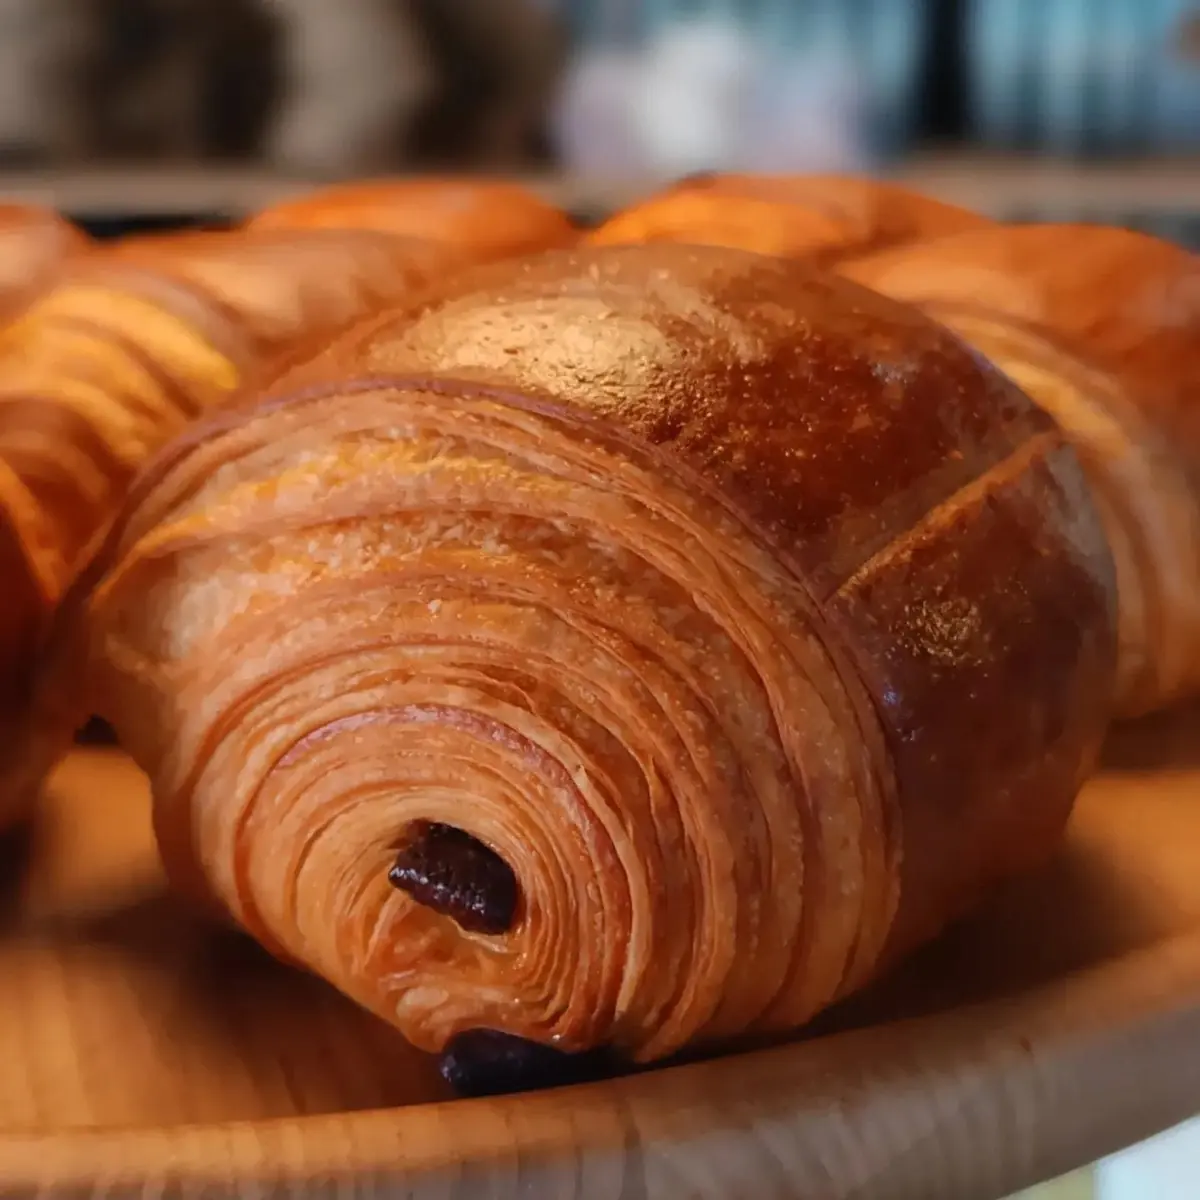
I want a crisp, deeply golden shell, visible laminated layers at the ends, a light honeycombed interior around the chocolate and two clean lines of melted chocolate through the centre. The pastry should feel light in the hand for its size.
If the crumb is heavy, the chocolate is surrounded by a thick bread-like band, or a pool of butter is left on the tray, I diagnose the dough temperature, butter plasticity, lamination and proof before changing the ingredient formula.